Friday, December 11, 2009
Horse web sites and search engines
Sunday, September 07, 2008
How UPS / Fedex could do more for the environment
The answer is obvious -- up to now most people only cared about getting their package as quickly as possible.
Well, guess what, the world is changing and there are now lots of people who care more about the environment than getting their new shoes on Tuesday instead of Wednesday.
So, UPS and Fedex, why not give us the option to opt-in to an 'Eco-friendly delivery' option either on shopping web sites OR directly with UPS/Fedex with an option where I can set my delivery address to 'batch all incoming deliveries such that any incoming non-priority package is delayed if there is another package behind it that would otherwise be delivered on consecutive days. If I set the option on your site this would trump whatever 2-day or 3-day option I chose on a shopping site.
Net result ... less pollution, lower costs for UPS/Fedex, and in many cases less inconvenience for me as I only have to open the door to UPS/Fedex once a week instead of twice or three times.
Sunday, January 07, 2007
High-tech glue on shoes
 First, you need to shape the shoe to fit.
 The shoe itself is fairly easy to shape as it's aluminum inside but the kevlar cuff tends to get in the way and the plastic coating makes it somewhat harder to get the shoe flat again while shaping it.
 Of course, a horse with hoof problems may well have some fairly irregular shaped hooves making it even more challenging to get the shape just right. I like to put the hoof down on the shoe to check that it's fitting well all around, here the cuff is pulled down to check the fit.
 The next part of the process needs both hands and it goes really fast so I don't have photos of it. Essentially you mix the glue, work it into the kevlar mesh and then apply it to the hoof. You then quickly wrap cling-wrap around it to hold it in place while the glue sets.
 After about 20 shoes you'll find you can do this quickly and without getting covered in glue. The key to success is to have everything laid out within easy reach before you start work.
The other absolutely key requirement is to get the temperature of the glue right before you start. Too warm and it will set before you can get it all mixed into the kevlar, too cold and it will take longer to set and thus will be more likely to having the horse move it by twisting their hoof on the ground while it sets. If it's warm, put the glue in the fridge for a few hours before you start, it's easy to get it warmed up again.
SoundHorse is the supplier of these shoes. We used them for over a year on this horse and overall they worked very well. Initially they were quite hard to keep on for very long but with practice and much more thorough surface preparation they began to stick much better. After a year however the hooves really needed a break from the constant exposure to glue and he's now barefoot in the pasture.
Friday, October 07, 2005
Secure mailboxes ... finished!
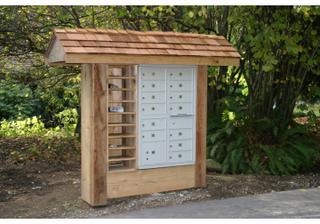
 Finally the mailboxes are finished and here's what they look like. As you can see, I tried to blend the gray Cluster Box Unit "CBU" in with its rustic surroundings by wrapping it in cedar and adding a cedar shake roof over it. Down the left the individual newspaper slots are sheltered from rain by the overhanging roof.
There will be no more mail theft from this neighborhood!
Sunday, September 25, 2005
Secure mailboxes ... (nothing to do with horses)
The first choice you need to make is whether to stick with individual secure mailboxes or whether to move to a Cluster Box Unit (or CBU). We decided to go with the CBU for several reasons:-
- More cost effective overall, individual boxes run $250-$300, we could install a CBU for ~$200 per mailbox.
- More secure: nobody is going to drag a 100lb mailbox off its concrete anchors~
- Provides secure outgoing mail which the individual boxes do not.
- Neater overall when built into a new compact mailstand.
- More efficient for the mailman, they can deliver to all mailboxes with just one unlock operation.
We puchased our CBU online from American Mailboxes and it arrived as promised. During installation we found one small problem in that the left hinge rod wasn't quite sunk low enough in the hole and it caught on the upper door jamb. This was easy to fix, and apart from that the unit is extremely well built.
Auth-Florence is the manufacturer of all the various CBUs you might want. They have various configurations from an 8 box unit to a 16 box unit. The 13 box unit has larger slots in it so you might want to consider that even if you have only 8 addresses as we did.
After pouring a concrete base with anchor bolts in it the box was mounted in place. A new cedar structure was then built around it to house the newspaper slots, and a shingle roof placed over it. The finished unit will blend nicely into the surroundings, and I'll post a picture when it's all done. I found the mailbox to be somewhat less rigid than I would have liked (there is some give in the mounting column), adding a rigid cedar structure around it improved this somewhat.
So now for the tricky part. Before you install a CBU you need to check with your local post office and get their approval. Ask for the 'delivery manager'. You then order it and install it. Now, label each slot with the old mailbox numbers, but you must do this in Carrier Route Order which is typically the order the mailboxes were on the mail stand before but in right-to-left order. If you can meet your mailman, work with him directly to label the slots the way he wants them before you hand out the keys. They typically write the house numbers on the metal shelves inside using a black marker. You do not label the outside of the mailboxes in any way other than the numbers 1-13 (or whatever) that they came with. Next you need to call back to the 'delivery manager' and ask them to come out and fit their keys to the mailboxes. After they do this you will not be able to gain entry to anything but the mailbox you own so make sure you are done labelling and installing the CBU before you call. After they've fitted their locks you can take down your old mailboxes and from now on all your mail will be secure.
With identity theft on the rise the installation of a secure mailbox like this seems like an obvious thing to do and I highly recommend it to anyone considering it.
Sunday, September 18, 2005
Upgrading our paddocks

After a couple of years of heavy use our run-in paddocks were looking somewhat worse for wear. Nearly a foot of cedar hogs fuel had packed down to just a few inches and despite several top-ups it was now all soggy. The protective barrier between it and the soil beneath had also been punctured by horses digging in their paddocks and it was generally getting hard to maintain.
The cheap option would have been to just drag the old hogs fuel out and put new hogs fuel in, but we decided instead to create a more permanent solution to the problem of keeping our run-ins in good shape and keeping our horses feet dry all winter.
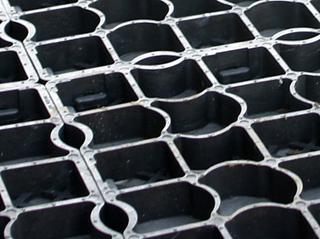
We found a local supplier for Hit-grid, a hi-tech plastic mesh grid and bought 1,000 sq ft. This forms a stable barrier that horses will not sink into. It is similar to some of the various geotextile plastic mesh grids used to build grassed over fire roads around some buildings. Having used a similar product before next to a driveway to create a mud-free grass area on which people can park all year round we had some familiarity with the concept.
After framing the area with raised railroad ties a 4-6" layer of 5/8" minus washed gravel was placed inside and levelled. To stop the railroad ties from drifting over time they were anchored to the ground using three foot long sections of rebar hammered through a tight hole into the soil beneath. The gravel was levelled in all directions using a long board to scrape the high points down and to find the low points that needed more gravel. After that a layer of filter fabric was placed over it to stop organic material from getting in to the gravel over time.

Next the hit-grid was snapped into place on top. No anchors were used as the weight of the grid and material on it should be more than sufficient to stop it from moving about.
We were advised to use sand on the grid but decided against it (can be bad for horses to ingest it, can cause scratches if not kept really clean, ...) and instead put hogsfuel back down. A much thinner layer was needed as the grid now provides all of the support and the gravel underneath provides drainage.
And now we just need to wait to see how it fares through the winter ...